Showing posts with label Kitchen. Show all posts

Friday, December 03, 2010

The State Of Our Home

Well....our house is slowly coming along. The renovations have turned into quiet a nightmare. We've been living with my inlaws since sometime at the end of September or beginning of October. And we'll probably be her for quiet a bit longer. Turns out there was so much more hidden damage than ever anticipated. In fact, my mother-in-law came home one evening and told me the kitchen had been gutted. Yes, gutted. Apparently, as they were taking down the outside stucco, they realized the floor joists were rotten and needed replaced. They were going to try and remove the cabinetry, repair the damage, and then put the cabinets back. But when they attempted to remove the cabinets, they all splintered beyond repair. So....we're getting a new kitchen too!

I'm incredibly excited about that and some of the other plans that are going on but at the same time, I desperatly miss home. Since Aubrey is due in just ten days and there is no way the house will be ready in time, we have resigned to the fact that we will be bringing Aubrey home to my inlaws. I know that we will receive a lot of help but I can't help but wish we were taking her to our own home. It's been quiet an upheaval at my inlaws house. There are seven of us living under one roof, plus our three dogs. One who is coming into heat soon. And soon there will be a newborn here! To say it's crazy at times is an understatement. Please keep us all in your prayers!

Here are a few photos of our house: (Some of these are a bit out of order but you get the general idea.)


The backside of our house.


The backside of the garage.


The side of the garage.


The laundry room sheeted in. Once all of the outside sheeting is done,
we can add Typar and the move inside to do the insulation and drywall.


The backside of my house at night.


Before - all the stucco is being removed to eventually put up siding.


And after. This is looking into the Roger Raglin room from the outside. See our new windows?


Kitchen - Before.


Kitchen - During.


Kitchen - almost After.


Kitchen - Officially After.


Standing in the entranceway looking into the kitchen...err...backyard.


Looking from outside into the kitchen. Shane is celebrating Mo-vember here.


Looking into my home from the outside. God Bless This Home. PLEASE!!


If you'd like to hear how my pregnancy is going and to see some crafts I made for Aubrey, please scroll down!

Tuesday, June 29, 2010

Organizing My Spice Cupboard

Sometimes blogging leaves me scratching my head. I hadn't posted in awhile due to adjusting to being pregnant - and I gained followers. I posted yesterday and within an hour, lost two followers. And then lost another follower today. Sheesh - was it something I said? :) Oh well, I guess you can't please everyone! Sorry to see those people go though. I do so love each and every one of you so much and want to thank you for hanging in there with me and my blog. The face of this blog may change a bit as I progress deeper into my pregnancy - sharing bumpdates, nursery progress and my thoughts and feelings on becoming a mom. But this won't be a baby blog so I hope you don't leave me just yet! Incorporating my pregnancy and future baby into this blog is only natural as this blog is about my life and how I'm meandering through it. But at the same time I want to share with you other things going on in my home, life and heart. I hope that's okay! Thanks again for taking time out of your busy day to spend a few minutes at Finding Home, for leaving sweet comments and sharing this blogging experience with me. I appreciate you!


So on to the post!

A few days ago I mentioned that I had some organizing projects in the works. The day after writing that, I was hit with three days of major fatigue where I barely got out of bed or my couch. I slept so much it was unbelievable! By the morning of the fourth day, I was wide awake at 5 a.m. rip rarin' and ready to go! Here's what I did to tackle my spice cupboard.


Before:


My spice jars were driving me crazy as it was so difficult to constantly shuffle them around to find the spice I needed. Asthetically this setup was working for me - but the function wasn't the best. Here's how I fixed it.


First Shelf After:


I puchased one of those wire step spice holder things at my local hardware store and put it to some good use. I can fit 12 of my jars on the steps. As you can see to the right, four jars didn't fit. So I merely stacked them. My spice jars came from Ikea. I love them because they remind me of old fashioned candy jars.


I also tried to organize my spices alphabetically. That is saving me a bit of time too.


To the right of the shelf, I keep nutmeg and various odd baking items like paking powder lined up. I also keep a jelly jar filled with salt for easy tossing into pots of boiling water or onto meat. Easy peasy! The little potato guy is my potato scrubber and the egg thing is my egg seperator.


Second Shelf After:


My second shelf is sort of my baking shelf. In the front row I keep my flavorings (vanilla, coconut, etc...) and food coloring. In one jar I keep my measuring spoons. I have three sets because far too many recipes require more than one teaspoon of this and that. In the other jar I keep tiny whisks and my flavor injector. In the back rows I have jars filled with baking soda, graham cracker crumbs, icing sugar and various other baking ingredients. I also have my container of molasses, baking cocoa, jars of sweetened condensed milk and evaporated milk. Basically if I need most baking supplies, I turn to my second shelf in the spice cupboard. Makes my life much more convenient!


Third Shelf After:


The top shelf is reserved for things I don't use too often. Extra jelly jars, extra salt and pepper shakers, my flour sifter and liquid measuring cups.


 My three tips for keeping order with so many little things are:

* Keep like with like.  All spices together, all tools together, baking ingredients together, etc.
* Put it back where you found it.  If everything has a home, it's much easier to find what you need. By putting each item back where you found it, you retain the order in your cupboards.
* Go vertical.  I stack when I can but I never put items I use frequently on the bottom of a stack. I'd also recommend getting those spice stairs. They really helped create a lot of space in my cupboard.

Hope some of these tips and photos will give you a little inspiration to organize your spice cupboard! Now who wants to come over and bake some chocolate chip cookies for me? You know where the ingredients are! :)

Saturday, March 06, 2010

Life Tied Up With A Bow


I had a bit of birthday money and for $1.97 this little bit of life came home with me from his shelf at Walmart. I think I gave him a pretty good home by my kitchen sink.

I spent way to much money on ribbon the other week at Michaels. Let's just say it was all on clearance and each spool had polka dots on it. Nuff said. Mmmm k.


But this bit of ribbon came wrapped around some birthday gifts my mom sent me. I was going to use the white and black polka dot ribbon I bought - but this dark forsest green goes much better with the little pot my fern lives in and my delicious smelling soap. Vanilla Bean Noel from Bath and Body Works.

Is there anything cuter than a tiny bow tied with cute ribbon? I think not.


Friday, February 26, 2010

My Dream Kitchen

I dream of a white kitchen.


Bright, sunny and full of natural light.


I dream of cabinets to the ceiling. And oodles and oodles of drawers and cupboards.


I picture a black countertop.

Or marble.

 .

It's my dream kitchen.


For some time now, I've planned to repaint my kitchen and cupboards. Thinking of redoing my counter as well. Wanting to invest the time to make it my dream kitchen. But the more I think about it, and the more I picture it all out, the more I decide I'm going in the opposite direction.

Black cabinets.


Like Emily.


Or Layla.

And all I can say is that I'm incredibly excited about it!

I can't stop thinking of it actually.
 I hope to start next week!


P.S. I just want to say a big thank you to those of you who left a comment letting me know that you have and will pray for little Luke. It matters in his life. Thank you. So far, he has had a spinal tap today to determine if the cancer is in his spine - and it is not. So that is an answer to prayer. And the second answer is that he has the better of the two forms of luekemia...ALL. Treatment looks like it will be for the next three years. So this little guy could use your prayers for quiet some time. I love his family with all of my heart and count them as some of my dearest friends. I ask that you would continue to pray for them. I'll keep you updated and want to thank you again. I knew I could count on you. So thank you.

Monday, September 21, 2009

Home Notebook - Menu Planning and Grocery List and a Download

In hopes to implament some more organization into my life, I created a Home Notebook. You can read about how that process began and about my Daily Routines in this post.

Here I'd like to show you my pages for my Meal Planning and Grocery List.


Do you meal plan?


When I first got married, I remember laying on my bed writing my first meal plan. I devoured my brandy-new cookbooks tring to find the most delectable recipes to make for my new hubby in our new kitchen in our new home. I was incredibly excited! To be honest, I still get excited making a meal plan. Maybe it's because I'm still a newlywed (being married almost 2 years is still a newlywed, eh?). But if I can be even more honest - I love to figure out what sort of yummy things we are going to eat. I love the idea of feeding my husband tasty, nutrious meals and I still love going through my cookbooks each week, trying out new recipes and enjoying old favorites.

Meal planning for me is also important for budgeting purposes. It keeps me focused on what is on sale, what I need to buy versus what we already have in stock, and what the heck it is that we will eat during the week. I hate it when the dinner hour rolls around and there is no plan! Too often that leads to fast-food and our wallet and waistlines don't appreciate it. When I have a good meal plan I am ready to face the week confident that we will be eating good, yummy meals and the fast food monstor stays away.

Awhile back I wrote a post on meal planning. It's way wordy and lacks any photos but if you are interested in reading it, here is the link.


I basically just divided up my paper into eight sections. Please refer to this post if you are interested in how I created this document. Seven sections are obviously for each day of the week. Each day is big enough to allow space for Breakfast, Lunch and Dinner. I'm trying to loose some poundage and I have learned that preplanning my meals is a major life savor so I knew when creating my Meal Planning page, I wanted plenty of space to write.


The eigth section is where I jot down what needs to be put on my grocery list. Sometimes I make my grocery list while I plan out my meals, other times, I don't. That little box just helps me to quickly identify the ingredients that need to go on the grocery list when I'm ready to fill out my complete grocery list. Make sense? I hope so.

My Grocery List breaks down the different sections of the grocery store.


The different sections I have included are:

Fruits and Veggies
Dairy and Frozen
Meats
Dry Goods
Bread
Household Items
Miscelanious (Things I want/need to buy like mascara, fabric or shoes.)

Each line in each text box has a little box next to it where I can check off the items that I have purchased. Throughout the week, if I notice we are low or out of an item, I put it on the grocery list. My hope is to get a nice clipboard and hang my grocery list on it somewhere in my kitchen but that's another project for another day. For now, I keep my list in my Home Notebook that is pretty much accessable to me at all times. Because of this list, I rarely "forget" if I'm out of an item. And, because I have my list divided into segements like I would find in the grocery store, I can easily cross off the items on my list as I finish shopping in that particular part of the store. I save myself time because I don't have to backtrack.


Each week I also go through each and every sale flyer. I take note of each item that I hope to purchase or that strikes my fancy. On the flip side of my Grocery List is where I write out those items. I also take note of the ounces/mls that each product is, the price, if I have a coupon or if it is only a one-day sale. Here is an example of what that looks like:

Superstore
Butter - $2.45
Quaker Granola Bars - $1.99
Cucumbers - 3/$1.00
Dawn Soap - $1.99 *$1 off coupon
Maybelline Mascara - Volumize - $4.99 *Price match at Walmart
This also helps in my meal planning. I know what is on sale and can then plan my weekly menus around that. It's all a system.
What do you do in regards to your grocery list and meal planning? I'd love to hear your tips and ideas! Please send them my way!

If you are interested in downloading my versions of a Menu Planner and Grocery List, please just click on the photos below and it will take you to the download page. Enjoy!


Menu Planner


Grocery List

Friday, July 24, 2009

Organizing Your Kitchen: Part 2


Organizing Your Kitchen: Part 2

To read about part one, head on over here.

In the past few days, since telling you about my idea for this kitchen organization series, I've been buzzing around my kitchen thinking of all the changes that I can make. As I've kicked around the topics I want to share, I've taken stock of my own kitchen and realized how much more effective my storage of "stuff" could be. I can't wait to share some of my changes with you in upcoming posts.


Before we get to any how-to's or cute pictures, I want share with you why I wanted to do this series. Here's the heart behind the how-to.

It is often said that the kitchen is the heart of the home. It's a place where we connect over a meal. A meal that has had time and energy and hopefully a whole lotta love poured into it. A kitchen is where you dream up holiday feasts. Feasts that bring together loved ones far and near. Where memories are made and joy is shared. The kitchen is a place where activity happens. Hopefully, it's a place where families connect.

But, one doesn't want to spend their whole darn day rummaging through baking dishes and moving mixing bowls to get to what you need. We want this space to be efficient so that we can get back to the real business - enjoying time with our loved ones.

When did you first set up the organization of your kitchen? For most of us, it was the day that we moved into the house. Though we were tired and weary from unloading the mountains of boxes from the moving van, we found a system that we thought would work for us. For those of us who moved into our home after just getting married...you know what I mean when I say that every single dish, bowl and utensil had to be washed and then put away. Maybe our organization process wasn't thought of clearly because you had been up to your nose in soap bubbles all day. You don't have to be stuck with that system though. So let's switch it up!

Don't be afraid! Don't be scared to take stuff out of entire cabinets! Don't worry about setting up new systems. Forget about being scared that your family won't be able to adjust. Kindly remind them that it is you who makes the dinner and unless they want that nightly job then you'll set up shop how you want it. Remind yourself not to get too attached to your Cool Whip storage bowls. That those holiday mugs can be packed away until the holidays. That it's okay to let go of a cookbook that you haven't used since 1993. Get ready for some new ideas on how to store your stuff!


So I think I'm going to break this whole thing down like this:

You may have heard it said that you should divide your kitchen up into "zones". So that's what I'm going to propose. Zones. This is what I'm thinking:

- Food Prep Zone
- Cooking Zone
- Storage Zone
- Cleaning Zone
- Eating Zone


Today we're gonna hit the Food Prep Zone.

Still with me? Good.

Food Prep covers your utensils, pots and pans, bakeware and appliances.


Pots and Pans
I made a post awhile ago about pot and pan storage. To this day it is the number one hit on this blog. I can see that people need some help in that area. Here is what I did. I also worked a system up similar to this in my sisters kitchen.

[The photos do no justice to the convenience this system brings me.]


First, nestle your pots. Getting them compact takes advantage of vertical space - something most of us have but don't always utilize. Nestle, nestle, nestle. I have a roaster that I rarely use but it needed a space to live. So he got put in the back of the cupboard but he had to serve a function. I put all of the pot lids in the roaster. It serves as a big metal basket. Say you don't have a roaster. How about adding an actual basket? If you have those lovely pull out shelves, this option would work great - a pretty basket to store lids. Keeping all of those lids together really allows you to nestle your pots and gives you back your shelf space.


In the photo you can see that I added a wire shelf over the roaster. [It came free from my mum-n-law.] On top of the shelf are my three nested colanders and my stock pot - lid on. Another thing I did to help myself out, is that I keep the handles of the colander and stock pot facing the cabinet door. That makes it easy for me to pull them out. It's the little things that save me a few seconds during the day. It really does make it easier for myself.


Here is a shot from my mom-n-law's cupboard. I helped her organize her kitchen last summer. As you can see, her storage solution takes advantage of the sides of the cupboard. Attached are small hooks that she can hang her fry pans on. Since her cupboard is narrow but tall, this is a great option. Take advantage of unused space.

How about these ideas from Martha Stewart?


She used dowel rods inserted into a board to make lid storage. She nestled!


Attach a towel bar to the door of the cupboard. Add lids. Take advantage of your door! Great option!


Another idea for a towel bar. Hang your pots off of one with some simple S-hooks.


Or try this idea. I suggest using a wire clip on basket (or two) to take advantage of space between shelves. I have one of these baskets that I picked up from the Dollar Store. It would hold pot lids well.
Small Appliances
Another thing that can be a nightmare in a kitchen is appliances. It seems that there is an appliance to pretty much do everything that we need. But are you really using all of them? As you go through your kitchen, try and remember when it was the last time you used your rice cooker. Or what about your smoothie maker? If you have a blender, you've already got a smoothie maker. My challenge to you, is to evaluate each appliance. Do you have some that do double duty? Be honest with yourself. Don't hang on to it just because it was a gift. Don't hang on to it because you may need it one day. If it's taking up space in your home, let it be something that you love and use. That pressure cooker could be taking up the space that a new Kitchen-Aid mixer could one day own but because you have to hang on to that cooker that you use twice a year, the Kitchen-Aid mixer stays at the store and not in your home.
How's that for a run-on sentence?


For my small appliances, here is what I have done. [Again, wow, bad photography on my part. Seriously, muuuch better in person.]


In the lower half of my pot cupboard, I have taken my appliances and made a home for them. In the back go the less frequently used things. Back there is a mini-chopper, my blender, the smoothie mug for my blender (keeping like things with like things), a sandwich maker and my deep frier. In front I keep our coffee pot (we use this maybe a few times a month...see how tiny it is?), toaster, and crock pot. These items are used more often than the things in the back. Everyone is lined up and has a spot. Keeping things in a row gives each item a home and doesn't force me to hunt through my cupboards looking for that elusive appliance. Can you use this tip in your home? Perhaps you can clear your counter by putting away your toaster. It really takes so little time to grab mine out of the cupboard. I think if I actually had it on my counter it would be more a nuisance than getting it out of the cupboard when I need it. Sell your unused appliances on Craigs List or Kijiji. Feeling generous? Donate them. How about to a struggling family or a college kid?


Utensils

Photo Courtesy of Martha Stewart

Next to my stove, I keep a large pitcher. In that pitcher houses my wooden spoons, spatulas, tongs, ladles and my whoozits and whatsits galore. In keeping it next to the stove, I'm at the ready when I need something to flip over, scoop up or smooth out. One day I dream of having a white pitcher with all wooden items and then in another pitcher all of my plastic items. But for now, everyone co-mingles. If you've got the space, why not put those frequently used items where you will need them most? If you generally mix up your cookie dough on your kitchen island, why not fill a container with some spoons and spatulas there? Or toss them - neatly - into a drawer closest to where you do your prep work. The point is to keep things where you need them most.

Here are some more utensil storage ideas from modernhomestorage.com.

Love the hanging utensils over the stove. The added shelf really pushes the storage to the max.


Add some decorate corbels from Home Depot. Attach a towel rod between the corbels. Hang S-hooks and then hang up your most frequently used utensils. Simple!


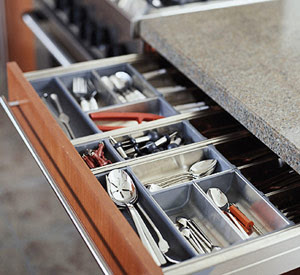
In my silverware drawer, to maximize space, I use a multi level sliding silverware tray similar to the one below. I have room for all of my silverware and a few knives.
Between the tray and the side of the drawer, I keep the rest of my rubber spatulas. In the space between the back of the tray and the back of the drawer, I store my measuring cups and various kitchen utensils like my ice-cream scoop and pizza cutter. I know where to find things when I need them. I can't say enough about a good, quality silverware organizer. If you are on the hunt for a new one, first measure your drawer space and then go looking for one. Try to figure out what items need stored in it and look for an organizer to meet your needs.

Below are some more silverware storage photos of storage solutions from modernhomestorage.com.


We'll save the bakeware storage solutions for another day. I think this post is long enough!! Hopefully this post has given you some ideas that you can put into use in your own home. Stay tuned for more storage solutions! Hope everyone has a great weekend!!

LinkWithin

Related Posts with Thumbnails